
Intro
I've always wanted to make my own C2 framework but have never really found the inspiration to, until I came across a post from Byt3bl33d3r talking about modernizing the CIA's C2 framework. This was somehow the first time I had come across a paper regarding Switchblade and Hive and I wanted to try and set up a mock version for myself.
A Quick Review Of mTLS
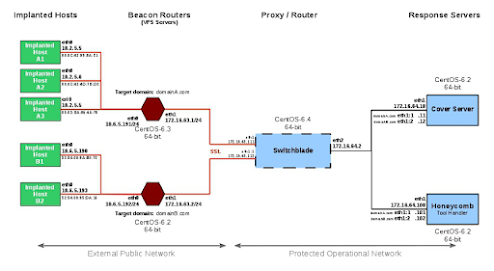
Before getting into the gritty details of this, let's review/introduce mTLS. mTLS stands for mutual authentication TLS. This is often implemented in zero-trust environments so that the client knows the server is who they say they are and vice-versa. Where a server normally only presents its certificate to connecting clients and then completes connections, mTLS adds the extra step of the client presenting their certificate so that the server can then verify them. The CIA developed Switchblade to use mTLS to authenticate beacon requests to the C2 server and send everyone else to a fake cover site. It can be seen in the diagram below taken from the Vault 7 leaks.
How Can We Leverage This?
I haven't seen a FOSS C2 framework specifically utilizing mTLS yet. There have been quite a few using HTTPS and that's fantastic, but it's always fun to take things one step further. In an engagement, when an analyst examines unusual traffic from workstations, forwarding those unauthenticated queries from them to something like google.com provides a minor level of credibility. Taking that further, you could even host your operations in the Google cloud so when they examine the IP it shows up as being owned by Google. This provides far more cover then returning a server error and sort of allows one to hide in plain sight.

Now into the details of the project.
Generating certs
It took me a little bit to figure out how to properly generate certs for mTLS that work well with our transparent proxy configuration until I came across this resource. I recommend following along with what they have written as it works flawlessly. Just ensure that your CN name matches up with the server name you'll be routing to, otherwise you'll encounter errors.
Nginx conf
The config for Nginx goes into /etc/nginx/conf.d/ and can be found here. There's nothing super fancy here, it's primarily the one leaked from the CIA and it uses an if statement to check the supplied certificates. If it fails, the client is transparently redirected to the cover site. We did add a few lines specifically that nginx documents as needed for facilitating websockets, but that's it. People familiar with nginx will notice that the websocket upgrade arguments are outside of where they should go according to documentation, but this was how it worked without errors and, while troubleshooting this, I noticed that CIA also had it setup this way.

Back-end server
Client
Python makes a fantastic test bed to get this up and running super quickly. Super quick might be a reach because the amount written on websockets and mTLS in Python is very sparse compared to other areas. But we're getting ahead of ourselves.
Before this, I should talk about what was tried and what failed. This started with doing web requests through Python to a back-end web server, with nginx routing it based off of certificates supplied or not. Which worked fine, the web requests were all routed correctly and they retrieved the page, but there was a hitch. This isn't an ideal solution in any way because the HTTP protocol is unidirectional and operates on a request response method. Once data is finished being sent, the connection is closed. Passing commands over GET requests is finicky and not very dynamic.
I next turned to sockets. Sockets are fantastic but fall just short of the mark here because, with the nginx configuration, I was able to send HTTP GET requests but was not able to get a socket to communicate back and forth through this transparent proxy.
What's the solution? Websockets. Nginx out of the box actually supports these really well and we can even see the CIA implementing the start of one in the example configuration leaked. Websockets big advantage is that they allow for bidirectional communication and they work easily with the transparent proxy.
Find the code for this here. For my example I smashed two projects together from here and here. The interaction between the client and server looks like this.

Update: We've got an interactive shell now!

Client in alternative languages
Alongside creating the Python client/server, I also wanted something which could more traditionally be compiled into an executable. We have a few candidates we can look at for this, I'm thinking Go or C#. Both languages are well documented, memory safe, and have very strong built in libraries. Unfortunately, I'm not super familiar with developing apps in either, so this will be an adventure. Expect more on this soon.
Following the CIA's recommendations
Since this is the CIA's general idea for command and control infrastructure, we might as well follow their recommendations for the implant. The CIA, alongside creating Switchblade, have a number of dos/donts for creating malware so as to avoid attribution and detection. These are great tips in general to make detection more difficult which is important in red team engagements. We've got to make sure our beacon traffic can't be replayed, the traffic is encrypted on the wire, the executable leaves a small footprint and is under 150kb, and that we obfuscate or encrypt any sensitive strings internally. There are others, but this is just a baseline.
Right off the bat, we're not going to be able to keep any compiled Python based executable under 1000kb, let alone 150kb, so we'll have to look at other languages for that. We have ensured though that communication between the beacon and the server is encrypted and it can't be replayed either. This leaves sensitive strings, which certs could fall under. In my beacon example, I just pass the directory and file to read from. But in a deployable version, you will want to incorporate these into the program. In Python, this is a little tricky as the sslSettings.load_cert_chain takes a cert file, not a variable with the cert as a string. So if you wanted to deploy this, you would need to deploy the cert file alongside - which is honestly an annoying short coming. How big of a deal this is depends on you. In Windows, we can add the certs to the cert chain and go from there, but the point is that we need to drop more than one file to make this work and you'll be expanding your footprint.
Conclusion
This was a pretty challenging project for me personally but I'm happy that I got the bare bones of it working the way I envisioned. I really want to get the PE version of the beacon setup so that I can do a mock red team exercise with a couple of Windows servers, server 2019 DC's, an ELK Security stack, and good ol' Windows Defender, but that's for the future. I think this provides a good base to build off of. If we look at a packet capture of this on the wire, we can see all the transmitted data is encrypted. Additionally, nothing can be replayed to the C2 server.
I'm annoyed that I can't seem to find a way around dropping multiple certificates on the host, and yeah they can be hidden, but it's increasing the footprint we leave which increases the risk you have of being discovered. I believe the certificates required is the reason you don't often see this deployed out of specific circumstances. I hope to continue working on the client/server architecture for this so expect more in the future.